Everyone knows that writing a Senior Thesis is an exceptionally time intensive process. I expected that conducting the research necessary for a 75+ page paper and actually writing it would take months of work. However, what I did not expect was how time consuming other aspects of my thesis would be. As I was finishing up my thesis, I realized (the hard way) that one of these aspects is formatting. While exact requirements vary by department, most theses must include document elements, such as chapter headings, page numbers, and table of contents. Adding elements like page numbers may not seem particularly challenging, but, when you’re working in a very long document, it can be quite tedious.
In an attempt to save you all some time and stress, I have compiled a short list of tips on formatting long documents in Microsoft Word that I learned mostly through Google searches and trial and error. Many seniors format their theses in programs other than Word, such as LaTeX (Alec has provided some helpful advice on how to use LaTeX in a past post). But if you are like me and are relying on Word, here are a few things to keep in mind:

Headers, Footers, and Section Breaks
Many people include headers and/or footers in their documents to display information like page numbers, chapter titles, and the author’s name. Inserting a header or footer is relatively straightforward–recent versions of Word have a tab in the main toolbar called “Document Elements” from which headers and footers can be selected.
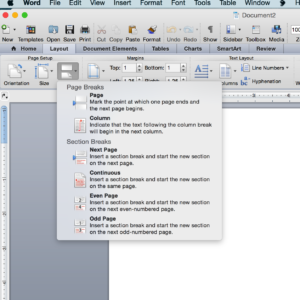
You may wish to have different headers or footers in different sections. Certain theses, for instance, have “Chapter One” written in the header of every page of their first chapter, “Chapter Two” written in the header of every page of their second chapter, and so on. In order to do this, you have to separate chapters into their own sections by clicking in between two chapters, going to “Layout” and selecting “Next Page” from the “Break” drop down menu. Because the chapters are now distinct sections, you can give them different headers, but you have to make sure that the sections aren’t “linked.” To do this, double click in the header or footer, select “Header and Footer” from the main toolbar, and uncheck “Link to Previous.” Creating section breaks between chapters is always a good idea because it allows you to edit one chapter without altering the spacing of the subsequent chapters. No matter how much you add to or take away from your first chapter, for instance, your second chapter will always start at the top of a new page.
Pagination
Adding page numbers is also relatively simple and can be done by selecting the page number icon from the “Document Elements” tab. You may wish to have different types of page numbers in certain parts of your thesis. For example, some theses use Roman numerals on pages before the first page of Chapter One (the pages with the acknowledgements, the table of contents, etc.). Once again, this can be done by creating section breaks and unlinking the sections as described above. Select the page number icon and then click “Format…” to choose the number type that you wish to use in the section in which you are working. From this window, you can also specify the number at which you would like your pages to start. This is an important feature if your chapters are unlinked because the page numbers will automatically start at 1 at the beginning of each chapter. To fix this, you can manually specify the page numbers at which each chapter starts using the “Format…” function. Doing so can be a little tedious, so it makes sense to save this step for when you are finished making major changes and know that your chapters’ page lengths are not still changing.
Tables of Contents
Microsoft Word has a helpful tool for creating tables of contents that can be found under the “Document Elements” tab. In order to use this tool, you should create chapter headings and subheadings using the “Styles” tool in the “Home” tab. Then go to the table of contents tool and insert the table into your document. The headings should automatically appear in the table of contents. If the pages on which sections start change as you work on your thesis, you can click “Update” and the table of contents will change accordingly. If you do not want to use the automatic table of contents feature, you can select a template from the table of contents tool and fill in the headings and page numbers manually.
These tips certainly do not cover all of the components of formatting a thesis, but hopefully they can save you time on some of the basics!
— Emma Kaeser, Social Sciences Correspondent

